Coming soon and flying high!
It’s not just since yesterday that we have been talking about more upcoming options for telling your adventures with Yora! On our roadmap, we already talked about the possibility of an interactive story. And you were the ones to frequently ask for this feature. Since let’s be honest, the story tab which the game master now scrolls through is not at its peak. What you currently see when you master an adventure is a pdf displayed which makes you scroll back and forth. This can break fluent storytelling and confuse everyone on the (digital) table. Also, our goal is to make finding a start in game mastering as easy as we can. We want to shrink the effort of planning an adventure session to its lowest possible amount! And this is not what it looks like now.
Side note on that: We started the first Yora Launch with a Minimum Viable Product. Now we are still in Open Beta and add the good features piece by piece and in a strong dialogue with our Community. This is why we now plan to add what Yora longs to have: The interactive scene view.
Also, we are thinking ahead… In the back of our little Triclap Studio we are already developing an editor. In the future, this editor will be available for you so you can create your own adventures for Yora! This is why in the following description not only explains what will be shown in the containers but also what will be implementable! So, if you like you can start to plan how your home brewed adventures can be inserted in Yora, now! 😉
By the way, did you recognize that the story in our newest adventure “Count Rudovils Loiterer” looked different? Having already designed most of the new story tab we desperately wanted to use the new design in this adventure. Some functions are not active yet. Sorry if that was confusing but we just wanted to let you enjoy this colorful new perspective. We are still on the job of tinkering the backend that makes this scene tab finally interactive and also integrates it in the application. But we want to use the time and take the step of explaining the magic and wonders that will surround you once everything works properly. ✨
So, let’s come to terms! To firstly get you a bit into the thinking of how to display an adventure on a tiny screen here you have an overview of the single assets that play a role and how they follow after one another:
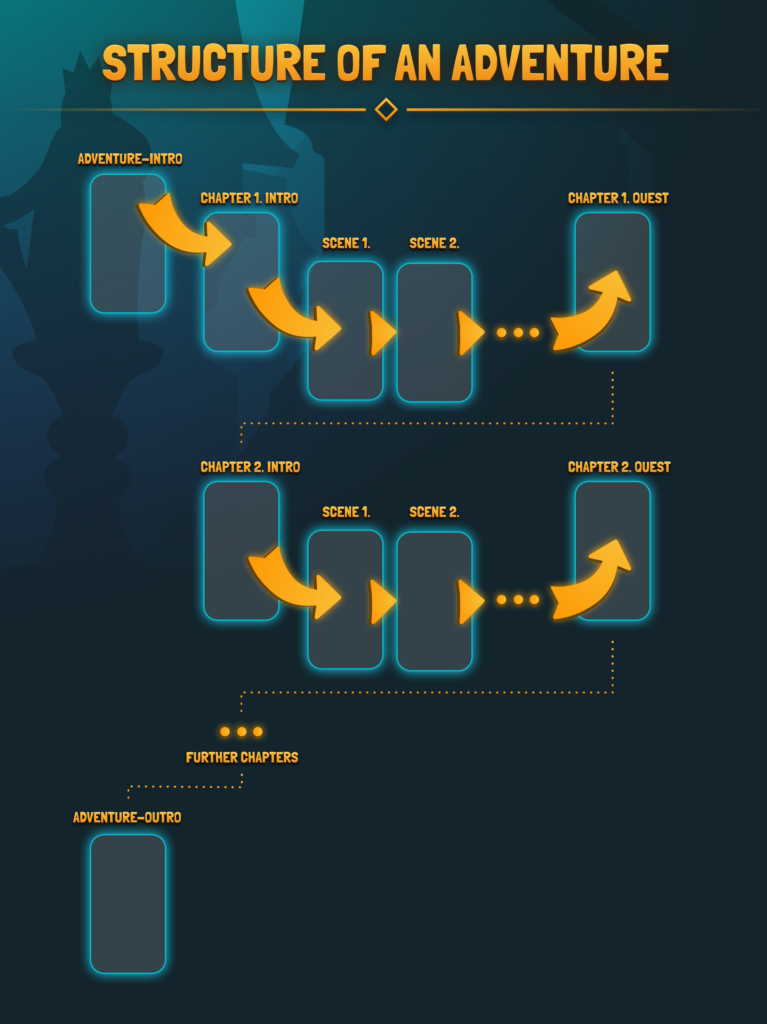
After entering an adventure as Game Master you will see the Interactive Story Tab – this how we like to call the sight of the Game Master. You will have three tabs at the top of your screen. Namely the Overview tab, the Story tab, and the Rewards tab. The Overview tab is like a table of contents for the adventure with conclusions of each chapter and the clickable scenes. Inside the Story tab, you will be able to read the actual scenes in detail and manage your story. The Rewards tab will stay the way you see it in your Yora app now.
The Overview tab will start with an intro for the adventure. This gives a short description of the adventure, what has happened in advance, and what will happen during the adventure. This container can be filled with text. Within an adventure, there are individual chapters. A chapter consists of a picture, a title, a short description, and the expandable tabs. At this point, I have to say that the tabs that you see in the picture for the chapters are already not the plan anymore as we decided to insert the quest rewards through a button on the chapter card and not as a tab bar. The individual rewards will still be managed through the third tab on the top of the screen.
The scene overview is where the interactive magic part happens. On the one hand, it just gives a quick overview of which scenes belong to the chapter and what will roughly happen within each scene. But by clicking on the thumbnail of a scene you will get directly to the story tab and to the respective scene. That scene that you just clicked on. With this feature, you can maneuver through the whole story without scrolling all the way back.
A single scene miniature consists of the following elements: Picture, title, and a short description.
Unfortunately, every adventure has its end. The Adventure Outro tab will provide a text for a worthy and festive conclusion of the adventure. But luckily being at the end of the overview tab does not mean that we are at the end of this blog post! We want to dig a little deeper into the story tab and explain which container you will have there.
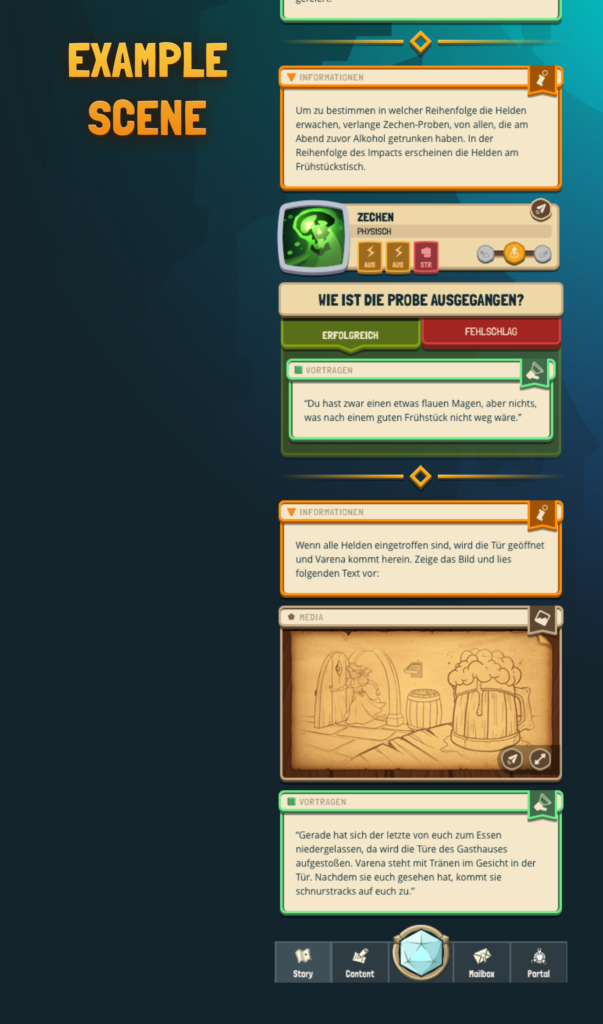
In this picture, you can see an example of how a scene will look like. As you can recognize it consists of different containers. The author of an adventure can create these containers and they will be displayed in a chronological sequence. Each color declares the special function of the container. This arrangement of the containers will help to understand step by step how a story works and which information should be handled in which way. The text of all containers is freely formattable and dividers can be played by the creator of an adventure wherever he or she thinks they will be useful! Also, items can be set in different kinds of containers.
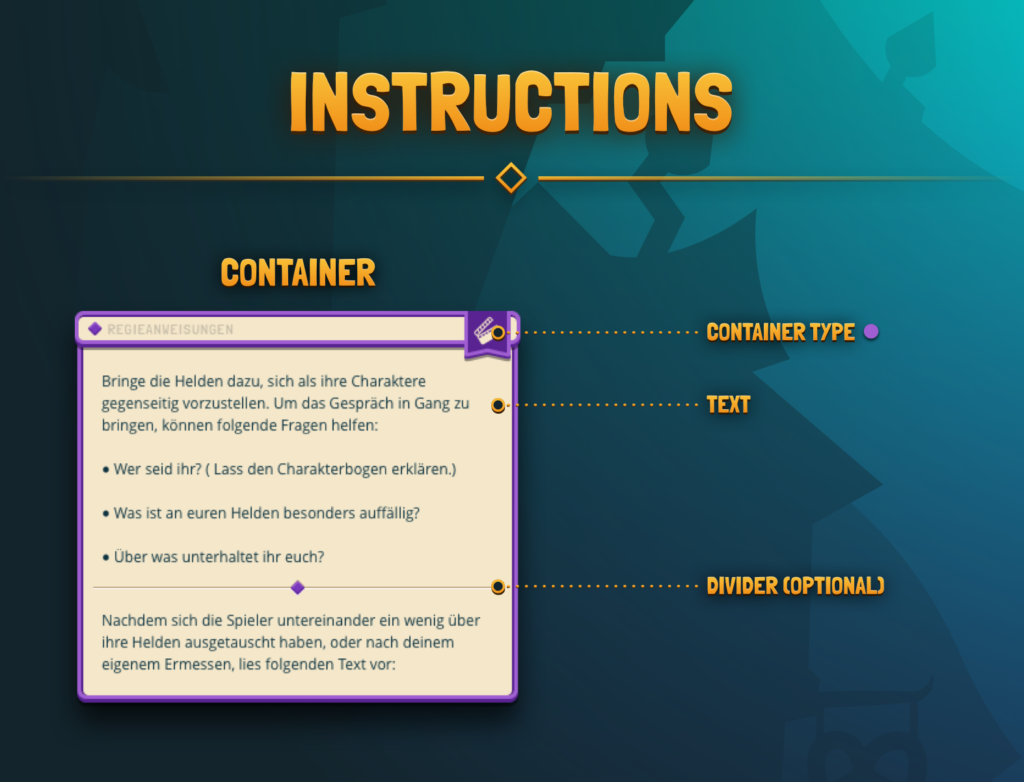
The instructions container is specially intended to help Game Masters who are new to the game. This way he gets tips, support, or instructions from the author to guide his players through the upcoming situation.

The recitation contains all parts of storytelling that can be read out loud to the players without the danger of spoilers. It can be a page from a book, a narrative text, or direct speech from Non-Player Characters. Also whole dialogues between characters can be displayed.
The information container holds background information. You can decide which adventure information you want to share with your players and which ones you want to withhold. Especially in this container, you can have items. The group can find these items so that the Master sends them to the players or they will be hidden forever.

Secret information are at the moment only intended for the Master and as the name says he or she should keep them secret for now. But it does not mean they have to stay secret forever. Finding the right moment to reveal a piece of truth belongs to the art of being a Game Master. And not knowing everything makes it exciting for the heroes to play the adventure! 🙂

The container environmental description is intended to help you in describing rooms, towns, lands, and all the beautiful places that your journey will lead you to! In addition to the title of the environment and a description text, there will be an “in the game” tab that gives exact information about the relevance of this place in the adventure. For example what the players can or should do there and what they could find.
Furthermore, there is the possibility to add pictures. These should make it easier for the Master to convey the atmosphere. It will be possible to display a picture in full screen and to send it to the players’ mailbox.
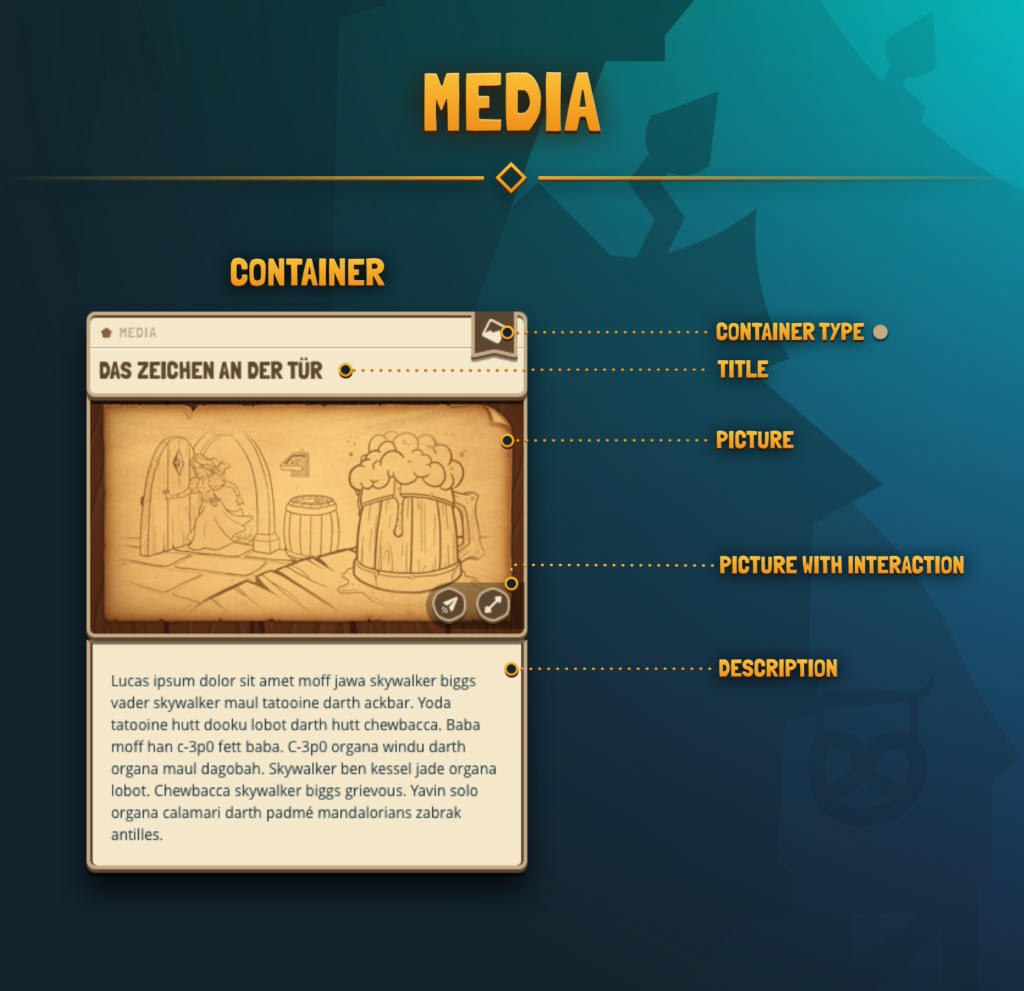
Some adventure creators like to integrate additional media to enhance the experience. This container is for you! In this container a picture will always be included, but text is optional! This can be mood pictures, puzzles, parchments, whatever you can pretend!
The Non-Player Character Container is by far the most complicated one. But I mean, it should describe a whole character in an appealing way! Some categories are already known by our current system. For example the classification of difficulty and attitude. They will just be displayed a little different: With tiny playing cards that are displayed on the top of the container. New is the classification of the importance of a character. The importance will describe how important the NPC is for the story and is displayed by the chess pieces farmer, knight, and king. All additional information is packed in tabs underneath.
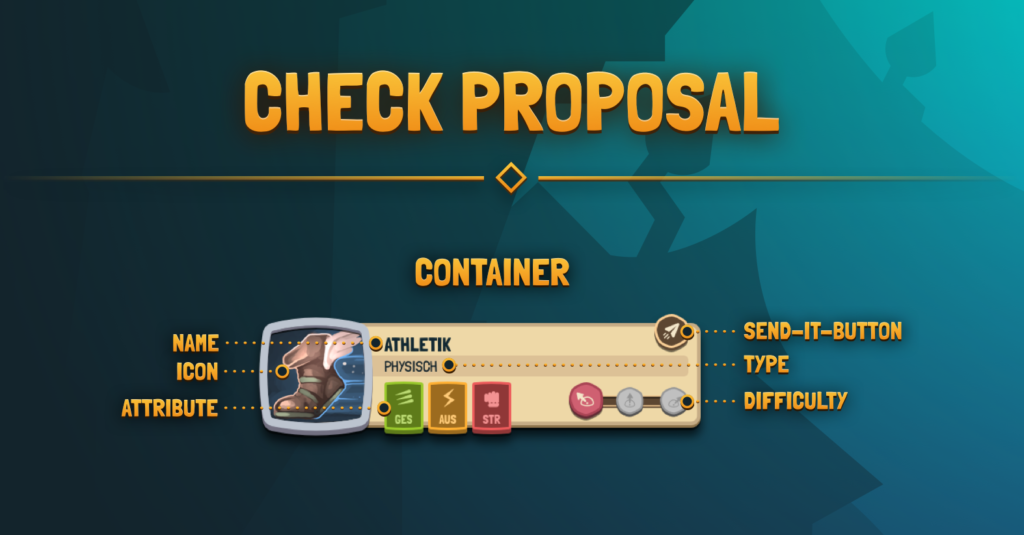
The author of an adventure can propose a certain check for you as the Game Master. This also includes a recommended difficulty but the Master is able to customize this as he or she wants. All this will be displayed in a check proposal container and can be an important help for new Masters who are not fluent in when to use which check.
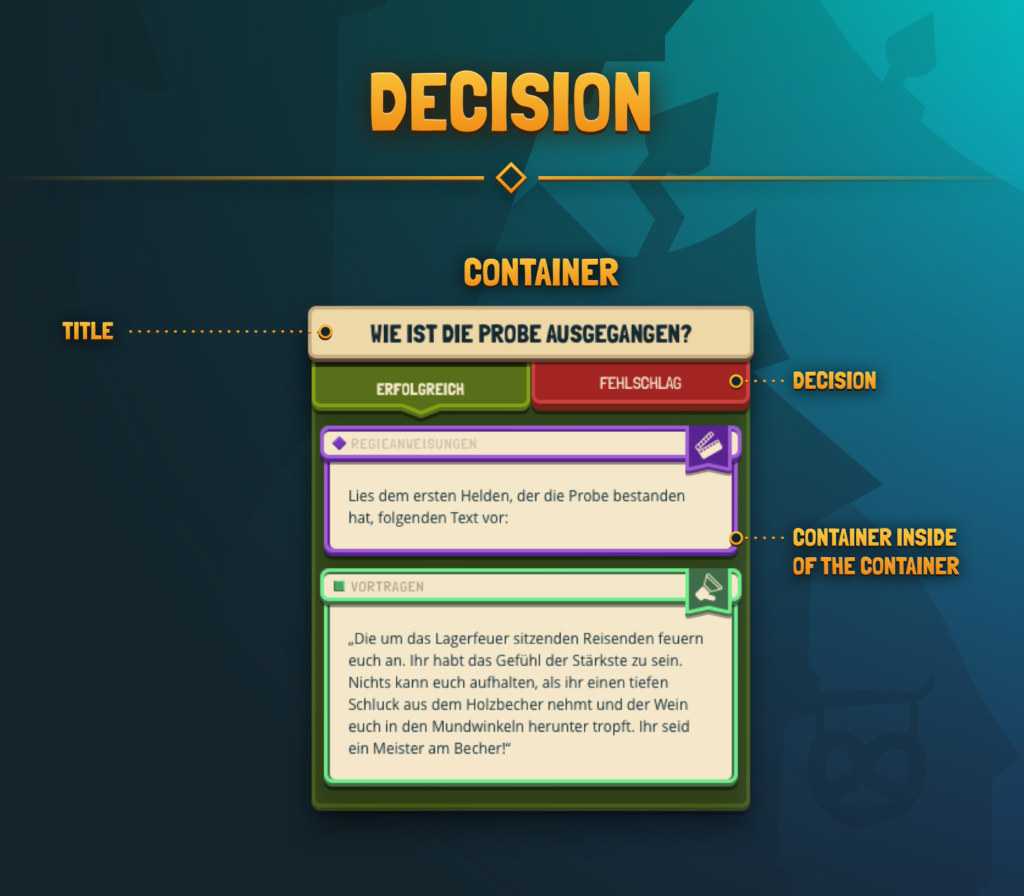
The container decision helps to deal with two different outcomes of a situation. The green tab shows a plot for the case that the players’ dice check was successful meaning: good for them. The red tab bar leads to an alternative story for a failed check. When you are creating such a fork as an author you should make sure that both storylines lead back to the actual plot of the scene and do not become too long. Otherwise, the plot of this scene could be very stretched compared to other scenes.

Roleplaying is a very creative game and heroes tend to have interesting ideas on how to solve a solution on, say, the “other” way. This what if container should be a help for you when you are new in mastering and need a little bit of expertise when your players have the craziest ideas.
Believe it or not, this was the last container for now. Now it is your turn! Tell us, what you think about these plans! You can still use the roadmap for that but we also embrace comments, emails to [email protected], joins on our Discord, we love every little piece of feedback and contact with you! So, write to us!
Will you implement your own adventure? Do you think there is any tool missing? Are you looking forward to the interactive story tab?
Comments (74)
Awesome! <3
This rework blew my expectations away guys!
Have some ideas but will write them on Discord.
Sure! Curious to hear about them all! 🤩